Cancel Order
 Logo Slider
 Cart Reservation
 Magic Menu
 PageSpeed
 DeleteX
 ChargeMe
 Age Restriction 18+
 DocumenThemix
 Agile Search
 Newsletter Popup
 IConvert Promotion
 Countdown x Bar
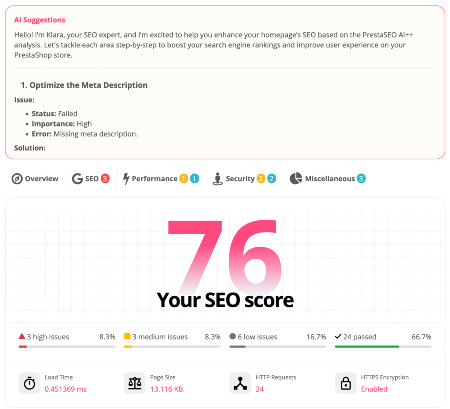
 PrestaSEO AI++
 GDPR
GDPRClear PrestaShop Cache: Admin, FTP, CLI and Manual Fixes
Want to clear cache in PrestaShop? Caching temporarily stores website and browser data, like images, CSS, JavaScript, and HTML files, to improve site performance and speed.
However, the cache can sometimes create problems when you modify your site, and the changes don’t appear right away. That’s why you may need to delete the cache manually or from the back office in PrestaShop 1.7 and 8.
Let’s research and learn the most effective way.

What is cache, and why do you need to clear it?
Hi! I’m Sarah. The cache is a mechanism that saves data such as images, CSS, JavaScript, and HTML files on your server or browser for faster access.
When a visitor requests a page on your PrestaShop store, the cache delivers the stored data instead of fetching it from the original source. This reduces the load time and bandwidth usage of the PrestaShop website.
However, the cache can also cause some issues when you update content or source code. Let's say you've just changed the color of your logo or added a new product, the cache may still show the old version and your visitors won't see the fresh things.
This can confuse your visitors and affect your conversions due to old cached information used by websites.
To avoid this problem, the solution is to clear the cache in PrestaShop whenever you make significant changes. This task will ensure that the online store displays the latest version of your content and layout.
Wondering how to clear cache from the PrestaShop back office?
This is the simplest solution: Simply clear cache from PrestaShop back office.
This method will delete the cache files that PrestaShop caches data using Smarty, which is the template engine used by PrestaShop.
To delete the cache from the back office in PrestaShop, follow these steps:
- Log in to your PrestaShop admin panel and go to Advanced Parameters > Performance.
- Under Smarty, click on the Clear cache button in the top right corner of the page to clear the Smarty cache from PrestaShop.
- You will see a confirmation message that says “All caches cleared successfully”.
- Refresh the page you worked on and check the changes.
How to clear PrestaShop cache manually.
Sometimes, the cache clearing function from the back office may not work correctly, or you may not have access to the admin panel. In that case, you can clear the PrestaShop cache manually by removing some files and folders on your server.
To do this for PrestaShop 1.7 and PrestaShop 8, follow these steps:
- Connect to your server via FTP or File Manager in cPanel.
- Navigate to cache folders:
- var/cache/dev (for development mode) or var/cache/prod (for production mode)
- img/tmp
- Erase all the files and folders inside these directories.
- Refresh the page you worked on and check the changes.
How to disable cache.
Another way to avoid cache issues is to turn off the cache completely. This may be useful if you are making frequent changes or testing new features.
Disabling the cache affects your website's speed and performance, as it loads all the data again for each page request from visitors.
Therefore, we do not recommend this option for live ecommerce websites.
To turn off the cache for PrestaShop 1.7 and 8, follow these steps:
- Log in to your PrestaShop admin panel and go to Advanced Parameters > Performance.
- Under Smarty, set Template compilation to Force compilation and set Cache to No.
- Click on Save at the bottom of the page.
Recommend tips for clearing cache in PrestaShop 1.7 and 8.
Here are some tips that can help you optimize:
Clear the browser cache. Sometimes, the cache issue may be caused by your web browser, not your site cache. To make sure everyone will see the latest version of the website, do not forget to clear your browser cache, too. The steps to take may vary depending on the app you use, but you can usually find this option in the settings or history menu.
Use a different browser or device. Another way to check if your site changes are visible is to use a different browser or device to access. This will help you rule out any cache issues.
Use a private or incognito window. A private or incognito window is a mode that prevents your browser from storing any data such as cookies, history, or cache. This can be useful for testing changes without clearing the cache.
Change your theme temporarily. If you are making changes to your theme or source code, you may need to change your theme temporarily to see the changes. This will force PrestaShop to load the new files instead of the cached ones. Go to Design > Theme & Logo and select a different one from the list. Then switch back to your original one when you are done testing.
Use a cache plugin. A cache PrestaShop plugin or service can help you manage and optimize your cache settings, and clear cache PrestaShop automatically or with one click.
How to delete cache in PrestaShop 1.6.
If you are using PrestaShop 1.6, you may also need to remove the cached data stored on the eCommerce store from time to time. The process is similar to 1.7 and 8 in two ways, but there are some differences.
To delete the old content from the back office, follow these steps:
- Log in to your PrestaShop admin panel and go to Advanced Parameters > Performance.
- Set Force compile to Yes and disable Cache.
- Click on Save at the bottom of the page.
For manually, follow these steps:
- Connect to your server via FTP or File Manager in cPanel.
- Navigate to your PrestaShop root folder and locate the following directories:
- cache/smarty/compile
- cache/smarty/cache
- img/tmp
- Delete all the files and folders inside these directories except the index.php file. These files and folders are related to Smarty cache, the template engine PrestaShop uses.
- Refresh the page you worked on and check the changes.
Note that deleting the cached files may not be enough if you are using a web host or CDN that has its own caching system, such as Cloudflare. Their features help make the online store fast loading.
In that case, you may need to delete the server cache from your CDN as well to reload new cache files. This may result in a slightly longer loading time for the website at first.
Conclusion.
The cache is a useful feature that can boost the performance and speed of your site, but it can also cause some problems when you make changes to your site, and they don’t show up immediately.
That’s why you need to know a way to clear cache from your PrestaShop online store. Leave your review of this PrestaShop tutorial by selecting the emoji below.
Quick answer: clear PrestaShop cache from Advanced Parameters > Performance first. If the back office is broken, remove cache folders by FTP or use Symfony console commands on supported versions, then reload with browser cache disabled.
Which PrestaShop cache should you clear?
| Problem | Best first action | Next check |
|---|---|---|
| Theme or CSS change not visible | Clear back-office cache and browser cache | Check CCC/JCH/YOOtheme generated files. |
| White screen or old template | Clear filesystem cache by FTP | Enable debug only on staging or briefly in production. |
| After module install | Clear cache and warm up pages | Test checkout, product pages and invoices. |
Cache cleanup and SEO recovery
After migrations or large content edits, stale cache can make Google and users see old titles, old structured data or broken CSS. Combine cache cleanup with a quick crawl, Search Console inspection and internal link check.