Cancel Order
 Logo Slider
 Cart Reservation
 Magic Menu
 PageSpeed
 DeleteX
 ChargeMe
 Age Restriction 18+
 DocumenThemix
 Agile Search
 Newsletter Popup
 IConvert Promotion
 Countdown x Bar
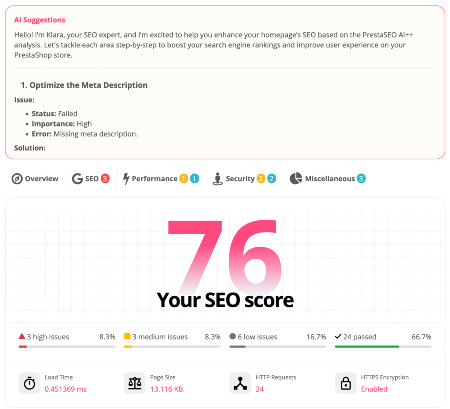
 PrestaSEO AI++
 GDPR
GDPRDisplay flags in the language switcher - P1.6, 1.7
Sometime you want to display flags in the language switcher in your Prestashop theme. Our clients also asked me how to show the flags and sometime wanna display the flags from dropdown to inline.
All you need is open this file : /your-website/themes/classic/modules/ ps_languageselector/ps_languageselector.tpl using your favorite code editor ( my tool: text editor :D ) and change it as you wish.

Step I - Language Switcher with flags
Take a look into the file. In both Prestashop 1.6 & Prestashop 1.7, you will find something like that:
  <li {if $language.id_lang == $current_language.id_lang} class="current" {/if}>
              <a href="/{url entity='language' id=$language.id_lang}" class="dropdown-item">
                      {$language.name_simple}
             </a>
  </li>
Ok, now we need to add the flag picture. Change it to:
  <li {if $language.id_lang == $current_language.id_lang} class="current" {/if}>
              <a href="/{url entity='language' id=$language.id_lang}" class="dropdown-item">
                   <img src="/img/l/{$language.id_lang}.jpg" alt="{$language.iso_code}" width="16" height="11" />
                   {$language.name_simple}
              </a>
  </li>
You might want to show the flag on current language. Find this code:
{$current_language.name_simple}
Change it to:
  <img src="/img/l/{$current_language.id_lang}.jpg" alt="{$current_language.iso_code}" width="16" height="11" />
  {$current_language.name_simple}
The language pictures are located in /your-website/img/l/ folder. Save the changes and enjoy the first step!
Step II - Display inline
In case you want to show the flags inline, open above file, remove everything and paste this source code into it:
<span id="language-selector-label" class="hidden-md-up">{l s='Language:' d='Shop.Theme.Global'}
{foreach from=$languages item=language}
            <a href="/{url entity='language' id=$language.id_lang}" style="margin-right:3px; margin-top: .9375rem;">
                   <img src="/img/l/{$language.id_lang}.jpg" style="{if $language.id_lang == $current_language.id_lang}border:3px solid rgba(0, 0, 0, 0.71);{else}border:3px solid #fff;{/if}" alt="{$language.iso_code}" width="22" height="17" />
           </a>
{/foreach}
As you can see, this is a basic and very simple Prestashop tutorial. The most important thing is to make sure your clients know where they are seeking.
If you’re ready to dive in and start customizing your Prestashop website, be sure to download Magic Menu to personalize the website menus as you wish.