Cancel Order
 Logo Slider
 Cart Reservation
 Magic Menu
 PageSpeed
 DeleteX
 ChargeMe
 Age Restriction 18+
 DocumenThemix
 Agile Search
 Newsletter Popup
 IConvert Promotion
 Countdown x Bar
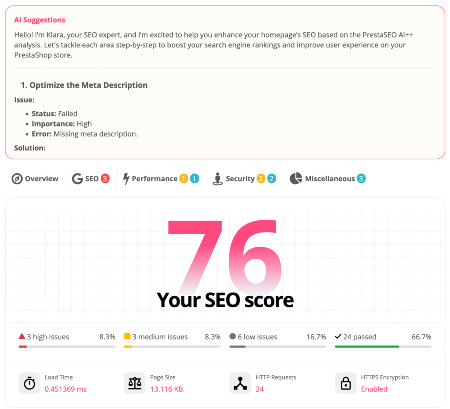
 PrestaSEO AI++
 GDPR
GDPRHow to Install PrestaShop 9: Step by Step Guide
Installing PrestaShop 9 is straightforward if you meet the server requirements. This step-by-step guide walks you through downloading, configuring, and launching your PrestaShop 9 store from scratch.
PrestaShop 9 Server Requirements
- PHP: 8.1 to 8.4 (recommended: 8.3)
- MySQL: 5.7+ or MariaDB 10.4+
- Web server: Apache 2.4 or Nginx 1.18+
- Memory: 256 MB minimum (512 MB+ recommended)
- HTTPS: SSL certificate required
Check our detailed PHP version compatibility chart for all requirements.
Step 1: Download PrestaShop 9
Download the latest PrestaShop 9 release from the official PrestaShop download page. Always download from the official source to ensure you get the latest security patches.
Step 2: Upload Files to Your Server
- Connect to your server via FTP/SFTP or use your hosting file manager
- Upload the PrestaShop zip file to your web root (e.g., /public_html/)
- Extract the zip file
- Set folder permissions: directories 755, files 644
Step 3: Create a MySQL Database
- Log in to your hosting control panel (cPanel, Plesk, etc.)
- Create a new MySQL database
- Create a database user with full privileges on that database
- Note the database name, username and password
Step 4: Run the Installation Wizard
- Open your browser and go to yourdomain.com/install
- Select your language and accept the license
- Enter your store name, country, and timezone
- Enter your database credentials
- Wait for the installation to complete (2-5 minutes)
Step 5: Post-Installation Setup
- Delete the /install folder — this is mandatory for security
- Rename the /admin folder to a custom name
- Log in to your back office
- Configure your shop settings, payment methods, and shipping
- Install your modules — check our PS9 module compatibility guide first
Common Installation Issues
- PHP version error — ensure your host supports PHP 8.1+
- Memory limit error — increase PHP memory_limit to 256M in php.ini
- File permissions error — set /var, /cache, /img directories to 755
- Database connection error — double-check your DB credentials
Hosting-Specific Instructions (cPanel)
Most shared hosting providers use cPanel. Here is a cPanel-specific installation walkthrough:
- Log in to cPanel → File Manager → navigate to
public_html - Click Upload and upload the PrestaShop 9 zip file
- Right-click the zip file → Extract
- Go to cPanel → MySQL Databases
- Create a new database (e.g.,
mystore_ps9) - Create a database user and add it to the database with All Privileges
- Visit
yourdomain.com/installin your browser to launch the wizard
Recommended PHP Settings for PrestaShop 9
Before installing, configure these PHP settings in your php.ini or via cPanel PHP selector:
| PHP Setting | Minimum | Recommended |
|---|---|---|
| memory_limit | 256M | 512M |
| max_execution_time | 300 | 600 |
| upload_max_filesize | 16M | 64M |
| post_max_size | 16M | 64M |
| allow_url_fopen | On | On |
Post-Installation Security Checklist
| Task | Why |
|---|---|
Delete the /install folder | Mandatory. Anyone can reinstall your store if this folder exists |
Rename /admin folder | Prevents brute-force attacks on admin login |
| Enable SSL (HTTPS) | Required for payments; improves SEO |
| Set file permissions 644, dirs 755 | Prevents unauthorized write access |
| Configure maintenance mode for setup | Hide incomplete store from visitors |
| Set up backups | Automate daily database backups from day one |
Troubleshooting Common Installation Errors
Error: "PHP version is not compatible"
Solution: Change PHP version in cPanel → MultiPHP Manager, or ask your host to upgrade. PrestaShop 9 requires PHP 8.1 minimum. Check our PHP compatibility guide.
Error: "Fatal error: Allowed memory size exhausted"
Solution: Add php_value memory_limit 512M to your .htaccess file, or edit php.ini. Contact your host if you cannot modify PHP settings.
Error: "Could not connect to database"
Solution: Double-check DB name, username, and password. On cPanel, the database user must be explicitly added to the database with privileges — creating both separately is not enough.
Error: Blank white page after install
Solution: Enable debug mode by editing config/defines.inc.php and setting define('_PS_MODE_DEV_', true);. Check /var/logs/ for PHP errors.
Error: Images not displaying
Solution: Set the /img directory and subdirectories to 755 permissions. Also check Preferences → Images → Regenerate thumbnails.
Error: ".htaccess is not writable"
Solution: Set .htaccess file permissions to 644. Create a blank .htaccess if it does not exist.
Error: Installer stuck at "Database creation"
Solution: Increase max_execution_time to 600 seconds. Large databases or slow servers may exceed the default limit.
Error: Back office CSS not loading after install
Solution: Clear all caches: Advanced Parameters → Performance → Clear cache. Also clear browser cache.
First Modules to Install After Setup
Once your store is running, install these modules first to establish a solid foundation:
- GDPR module — compliance is mandatory for EU stores. See our GDPR compliance guide
- SSL certificate — enable HTTPS in Shop Parameters → General
- Google Analytics 4 — track traffic from day one
- Payment gateway — Stripe, PayPal, or local payment provider
- SEO module — configure meta tags, sitemaps, structured data
- Security module — brute force protection, reCAPTCHA
Check our module compatibility guide to ensure all chosen modules support PrestaShop 9.